MAAS is not a virtualisation system. It’s an OS deployment tool. We will use it later to deploy software quickly, such as OpenStack, which we can use for virtualisation.
MAAS is normally installed on physical machines. We don’t have enough physical machines, so we will use virtual machines in this lab.
Every MAAS setup requires a controller server. Needs about 20 GB disk space (for OS images to deploy) and 2 GB RAM. (why?) The controller should really have two NICs: one for the outside world, and one that it controls DHCP on, to communicate with all the controlled nodes.
Install VirtualBox.
If you already have VirtualBox installed, please note that we are going to disable DHCP on the Host Network Adapter vboxnet1. Please check whether any of your virtual machines are using this adapter. If they are, please choose a different one in the following examples.
Open VirtualBox Preferences > Network > Host-Only Adaptors. Ensure that you have at least two listed: vboxnet0 and vboxnet1. If not, click on the Add button to the right of the list to create them.
Double-click on vboxnet1 and change the address of the Host Network Adaptor:
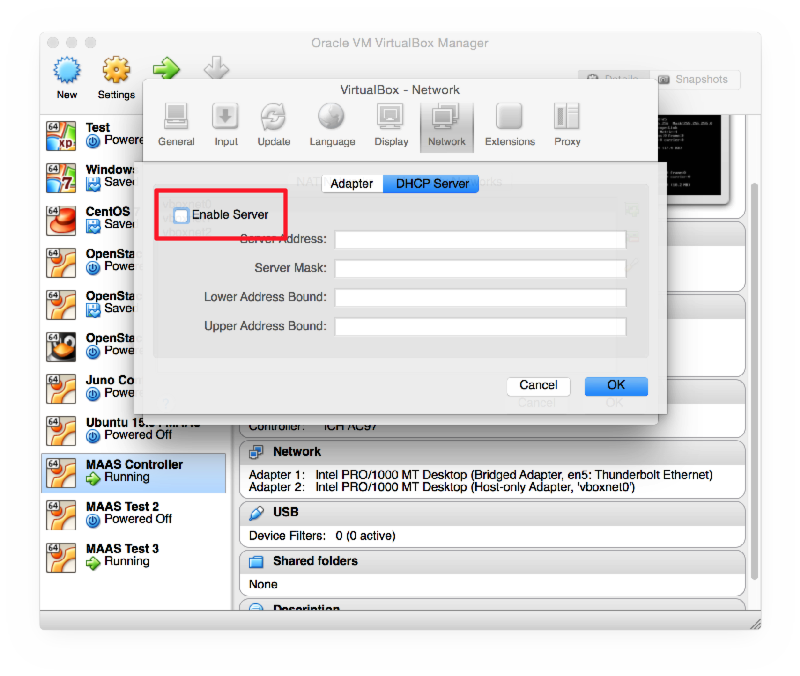
Then disable the DHCP server:

Then exit and restart VirtualBox, otherwise this change will not take effect, as we discovered after an hour of debugging!
Create a new VM called MAAS Controller. Give it 1 GB RAM and a 40 GB VDI disk, dynamically sized.
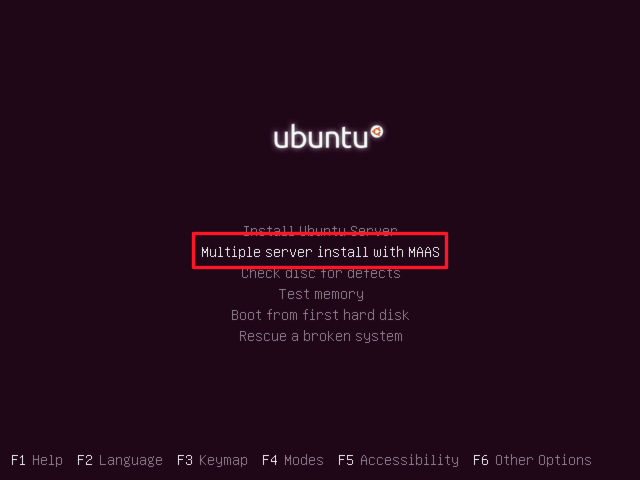
Start the VM and attach the Ubuntu 14.04 Server 64-bit CD. Choose the Multiple server installation with MAAS option:

When asked which MAAS server to use, choose Create a new MAAS server on this instance.
The MAAS server needs more memory than you might want, so we need to give it a big swap space.
Instead of the default Guided Partitioning, choose Manual, then SCSI3, then:
When asked for a proxy server, enter this one (to save a LONG install time):
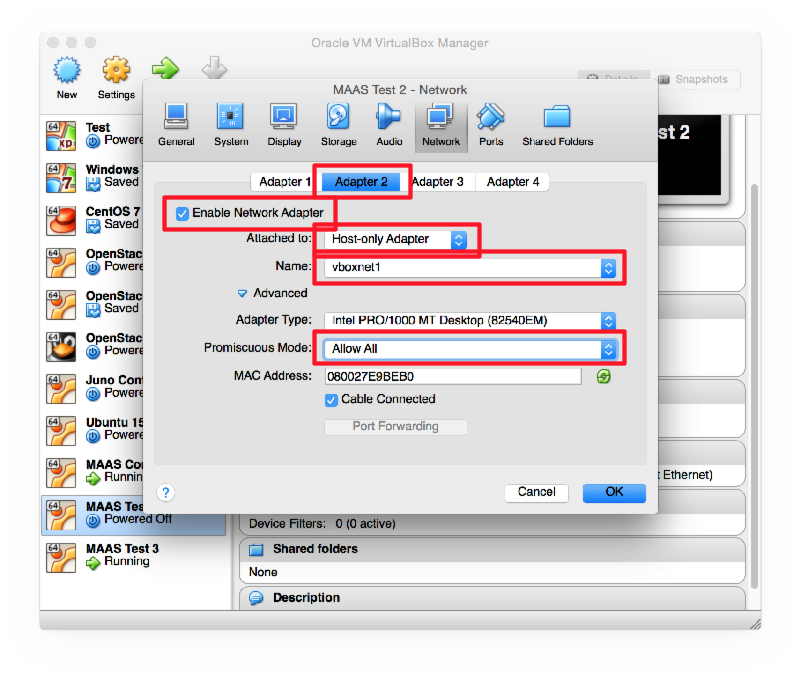
After installation, shut down the machine and reconfigure its network interfaces in VirtualBox

Then start the machine again. Log in on the console and edit /etc/network/interfaces to look like this:
# The loopback network interface
auto lo
iface lo inet loopback

# The primary network interface
auto eth0
iface eth0 inet dhcp

auto eth1
iface eth1 inet static
	address 192.168.57.1
	netmask 255.255.255.0
Then reboot the host, log in again and run the following commands:
sudo apt-get install patch
cd /
wget -O- http://197.4.11.251/utils.patch | sudo patch -p0
sudo maas-region-admin createsuperuser
This will create a new administrator user, for which you will have to enter a username and password and an email address. Then run:
sudo http_proxy=http://197.4.11.251:3128/ maas-import-pxe-files
The last command will take some time to run, you can leave it running.
Open http://192.168.57.1/MAAS in a browser on your laptop and you should be able to log in.
Go to Clusters > Cluster master > Add interface and configure it like this:
And click on Save interface.
Click on the cog icon in the top right, find the box marked Proxy for HTTP and HTTPS traffic,
and enter http://197.4.11.251:3128. Click on the Save button.
Then use the console to reboot the server.
In VirtualBox create a new VM called MAAS Node 1. Give it 1 GB RAM and a 40 GB VDI disk, dynamically sized.
Configure its network Adapter 1 to use a Host-Only network, and select vboxnet1. This client should only have a single network adaptor.
Start the client and immediately press F12 to select a boot device, then press L to boot
from the LAN. This should boot from your MAAS Controller. It should get to a login screen
(saying maas-enlisting-node login:), sit there for about 15 seconds (with the network connection
active, as you can see from flashing network lights in VirtualBox), and then shut itself down.